Deploying a Django Application on EKS
Background
In the previous blog, I successfully containerized a Django project and deployed it on a local Kubernetes cluster. With the development stage now complete, the next logical step is to move to the production stage. For this, I have decided to deploy the production environment on Amazon’s Elastic Kubernetes Service (EKS).
Structure
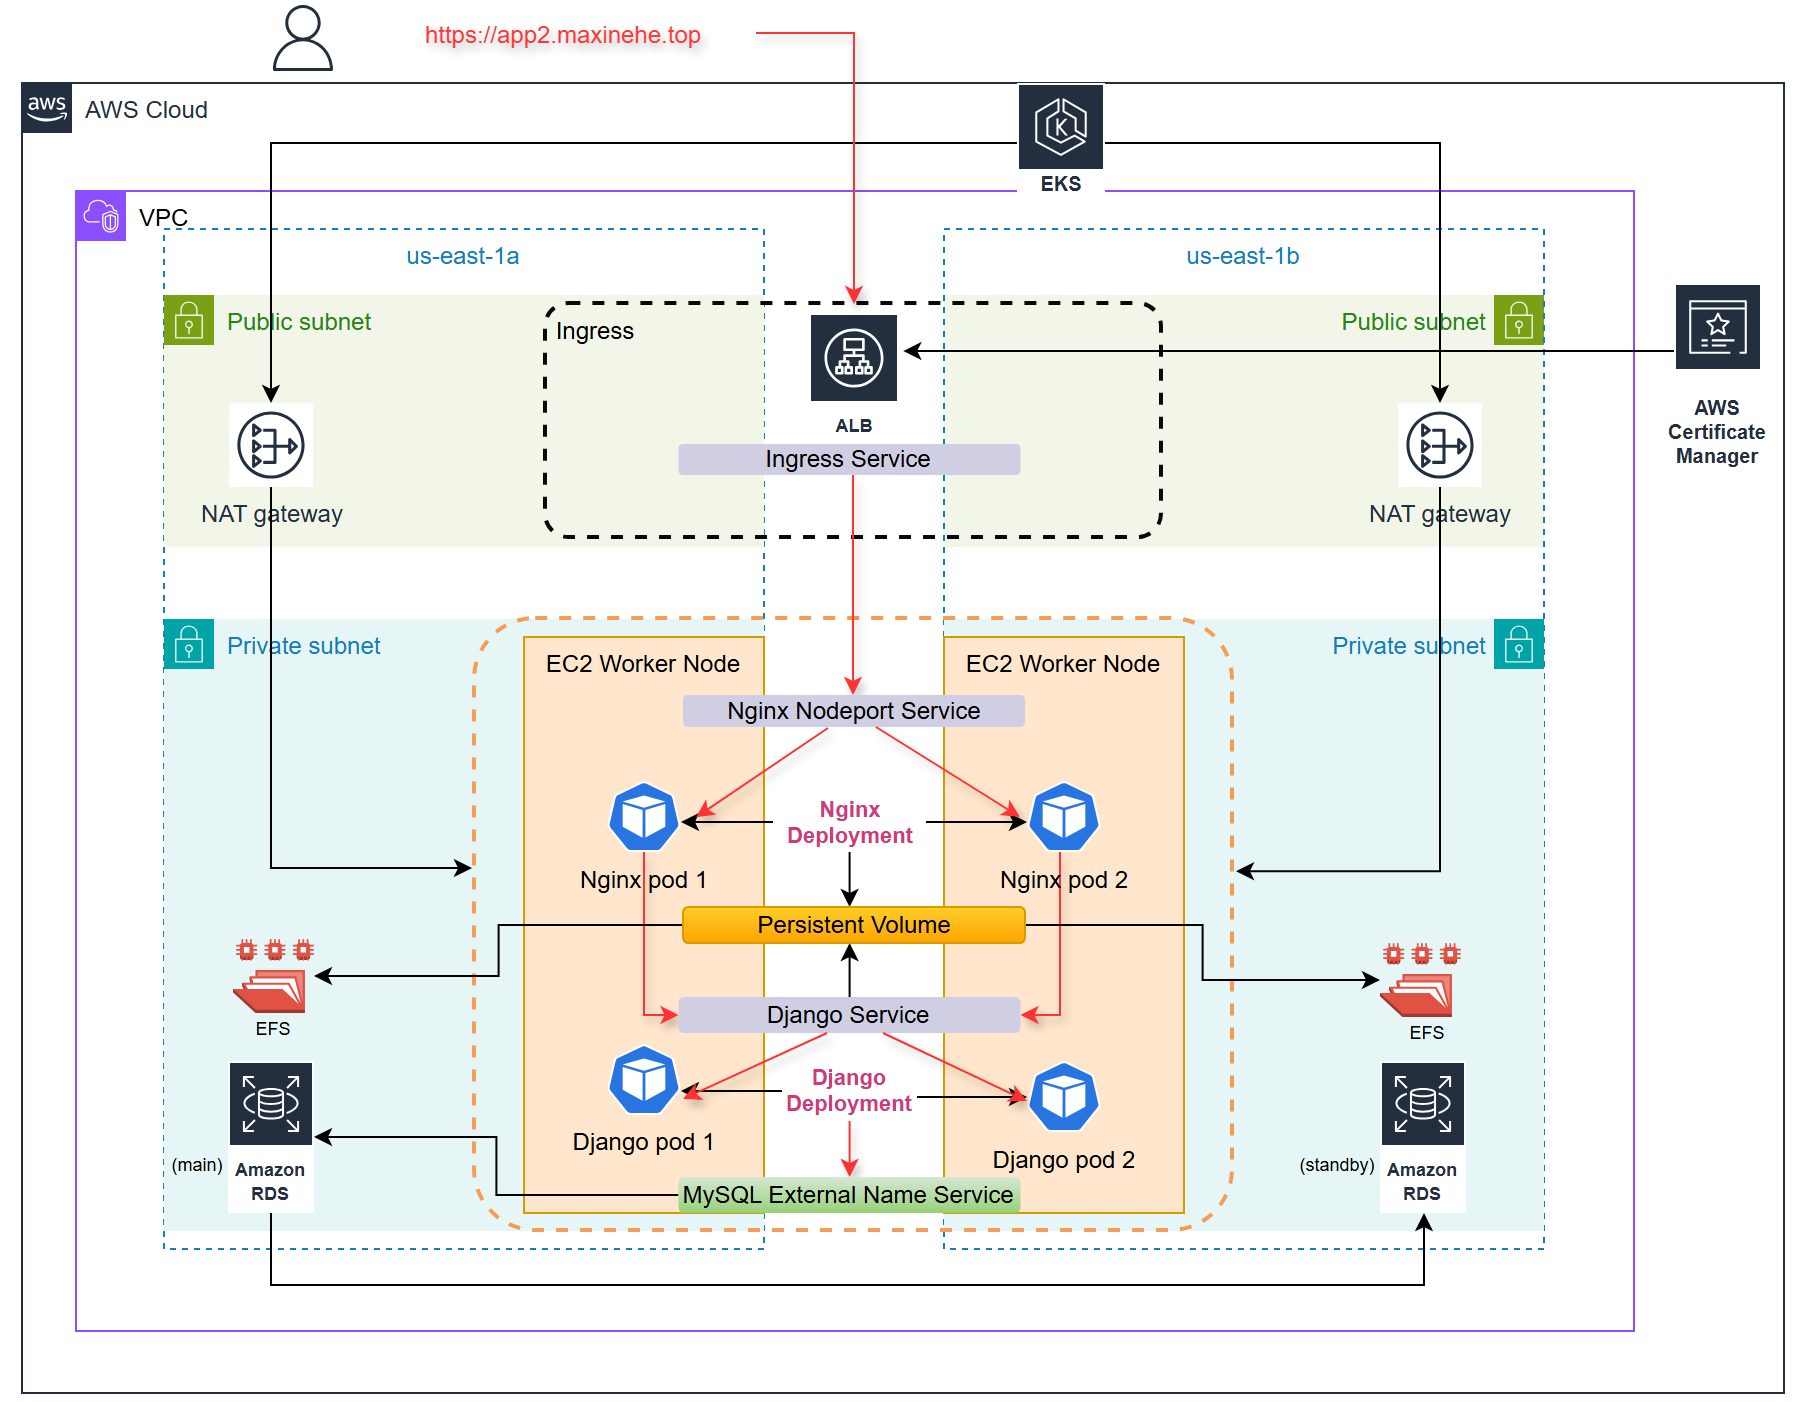
- User Request: It all starts when a user sends a request to our domain.
- Application Load Balancer (ALB): The ALB catches that request and directs it to the Nginx service in our EKS cluster.
- Nginx Service: Nginx plays a dual role:
- It forwards requests to the backend Django service.
- It serves static files stored in a Persistent Volume backed by Amazon Elastic File System (EFS).
- Django Service: This is where the magic happens! Django processes the requests and interacts with our database as needed.
- Amazon RDS: This is our go-to for managing application data—it’s reliable and scalable.
- Static File Handling: During pod initialization, Django generates static files that are stored in the EFS-backed Persistent Volume, making them easily accessible for Nginx.
This architecture combines the strengths of each component, resulting in a scalable and highly available environment for my application.
In this blog, I’ll provide detailed preparation steps for setting up EKS and the necessary AWS services. If you’re interested in how I deployed the application, you can find all the code here.
EKS Cluster Setup
1. EKS Cluster Creation
Setting up the network environment for an EKS cluster is a crucial step. This includes creating a VPC, subnets, routing tables, NAT gateway, and Internet Gateway. While it’s possible to create this entire stack with just a few clicks in the AWS console, I discovered a more efficient and proper approach is to let the
eksctldo the wonders. I’ll explain the reason in more detail in a later section.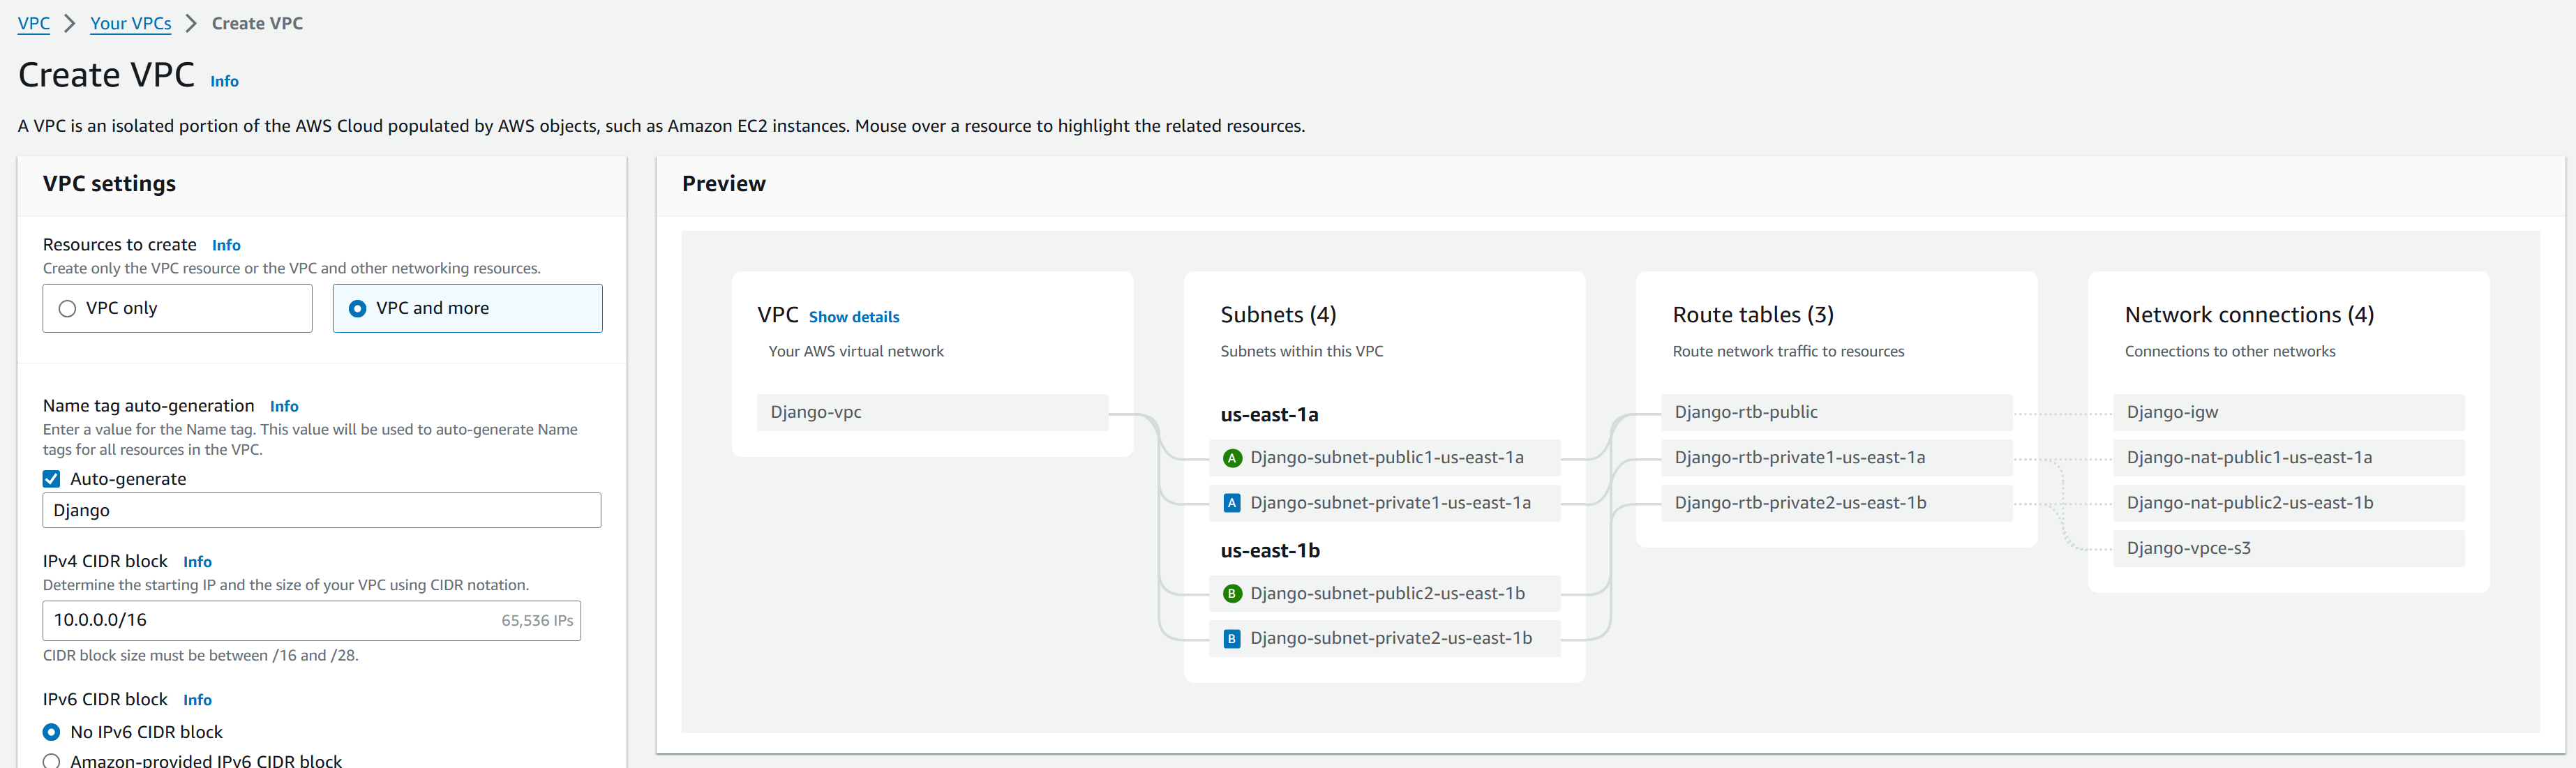
Create a EKS cluster using eksctl with two manged nodes in private subnets of AZ us-east-1a and us-east-1b.
1
2
3
4
5
6
7
8
9
10
11
12
13
14
15
16
17
18
eksctl create cluster \
--name=django \
--region=us-east-1 \
--vpc-private-subnets=subnet-087323c58ee821927,subnet-0028e0d56a1ca7a3c \
--vpc-public-subnets=subnet-02c71c32c2681614b,subnet-04402abb7a7b17e79 \
--nodegroup-name=django-eks-private1 \
--node-type=t3.medium \
--nodes-min=2 \
--nodes-max=4 \
--node-volume-size=20 \
--ssh-access \
--managed \
--asg-access \
--full-ecr-access \
--appmesh-access \
--alb-ingress-access \
--node-private-networking \
--with-oidcDuring the cluster creation, I encountered an warning message:
IRSA config is set for “vpc-cni” addon, but since OIDC is disabled on the cluster, eksctl cannot configure the requested permissions; the recommended way to provide IAM permissions for “vpc-cni” addon is via pod identity associations; after addon creation is completed, add all recommended policies to the config file, under addon.PodIdentityAssociations, and run eksctl update addon.
At this time, it appears to be an open issue with eksctl. OIDC acts like a broker between the EKS cluster and the IAM service to grant permissions to service accounts for utilizing AWS services.
To verify if the OIDC provider is created, you can try to create one by running the following command. If OIDC is not created for the cluster, it will create one; otherwise, it will output a message.
1
eksctl utils associate-iam-oidc-provider --cluster django --approve
Also ensure a role and service account are created for vpc-cni by use the command as follows.
1
eksctl create iamserviceaccount --name aws-node --namespace kube-system --cluster django --role-name AmazonEKSVPCCNIRole --attach-policy-arn arn:aws:iam::aws:policy/AmazonEKS_CNI_Policy --override-existing-serviceaccounts --approve
Once the EKS cluster is up and running, use
kubectl get nodesto verify our connection to the API server. If you encounter any connection issues, you can update your kubeconfig locally with the following command:1
aws eks update-kubeconfig --name django --region us-east-1
Enable EKS logging in Cloudwatch (optional)
1
eksctl utils update-cluster-logging --enable-types all
After setting up our EKS cluster, the next step is to enable essential add-ons. These add-ons are crucial for our application running in the EKS Kubernetes cluster. To do this:
- Navigate to the EKS console in AWS.
- Select cluster “django”.
- Go to the “Add-ons” tab.
- Choose “Get more add-ons”.
- Enable the following add-ons:
- Amazon EFS CSI Driver
- Amazon EKS Pod Identity Agent
2. ECR Repository Setup
To manage our Docker images and automate the build process, we’ll set up an Amazon Elastic Container Registry (ECR) repository and configure AWS CodePipeline. Here are the steps:
- Create a repository in ECR:
- In my case, the repository name is
eks/django-eks.
- In my case, the repository name is
- Set up AWS CodePipeline to build and upload a new image whenever the app data is modified:
Configure CodeBuild with the following
buildspec.yml:1
2
3
4
5
6
7
8
9
10
11
12
13version: 0.2
phases:
build:
commands:
- aws ecr get-login-password --region us-east-1 | docker login --username AWS --password-stdin 637423641675.dkr.ecr.us-east-1.amazonaws.com
- echo "current directory"
- pwd
- cd $CODEBUILD_SRC_DIR/app
- echo "directory changed to:"; pwd
- docker build -t eks/django-eks .
- docker tag eks/django-eks:latest 637423641675.dkr.ecr.us-east-1.amazonaws.com/eks/django-eks:latest
- docker push 637423641675.dkr.ecr.us-east-1.amazonaws.com/eks/django-eks:latestSet the trigger path to
app/**/*to initiate the pipeline when changes are made in the app directory.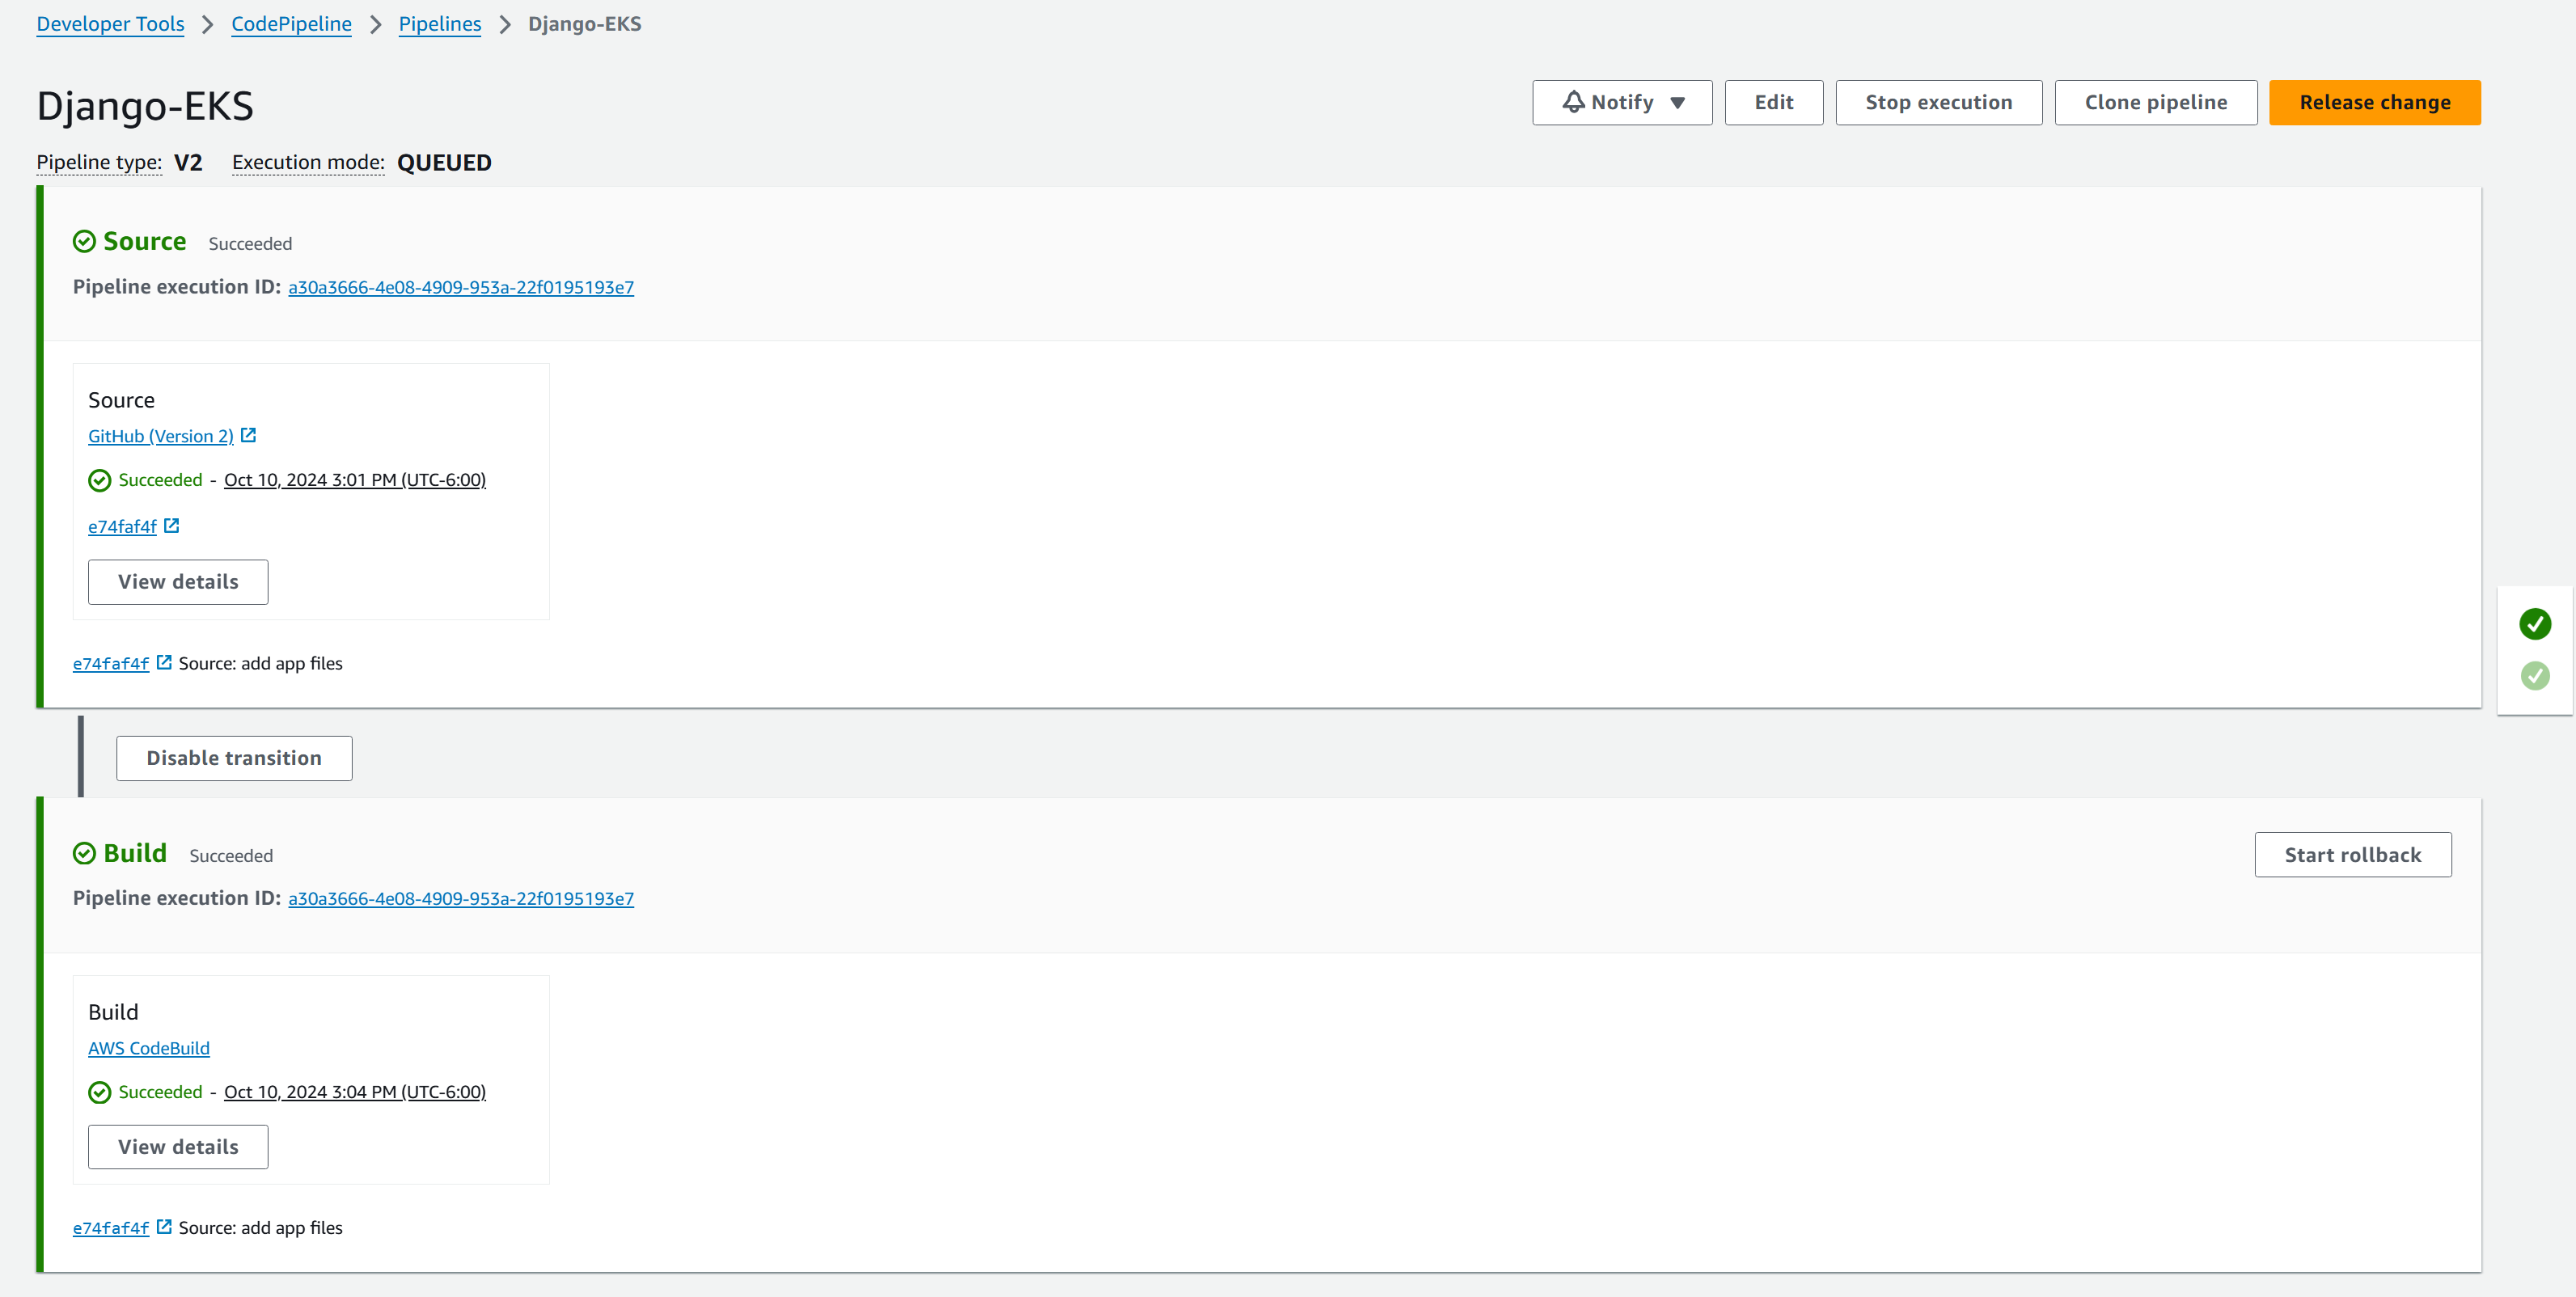
3. Install Helm Deploy applications with Helm on Amazon EKS - Amazon EKS
1 | choco install kubernetes-helm |
4. Kubernetes Dashboard Deployment (optional)
To better monitor and manage our EKS cluster, we’ll install the Kubernetes dashboard. This provides a web-based UI for interacting with our cluster. Here are the steps:
First, add the kubernetes-dashboard repository to Helm:
1
helm repo add kubernetes-dashboard https://kubernetes.github.io/dashboard/
Deploy the dashboard using Helm:
1
helm upgrade --install kubernetes-dashboard kubernetes-dashboard/kubernetes-dashboard --create-namespace --namespace kubernetes-dashboard
Create a service account for accessing the dashboard:
1
kubectl create serviceaccount admin-user -n kubernetes-dashboard
Bind the admin role to this service account:
1
kubectl create clusterrolebinding dashboard-admin --clusterrole=admin --serviceaccount=kubernetes-dashboard:admin-user -n kubernetes-dashboard
Generate a token to access dashboard:
1
kubectl create token admin-user --duration 110h -n kubernetes-dashboard
Set up local proxy to use the dashboard:
1
kubectl port forward service/kubernetes-dashboard-kong-proxy -n kubernetes-dashboard 8000:443
Navigate to http://localhost:8000 in the web browser. Enter the token generated to log in.
This dashboard will provide valuable insights into cluster’s health, workloads, and overall performance, making it easier to manage the EKS deployment.
5. EFS Configuration for Static Files
Create EFS in the console (EFS is regionally available by default).
Modify subnet mount points to include the two AZs where the EKS worker nodes reside:

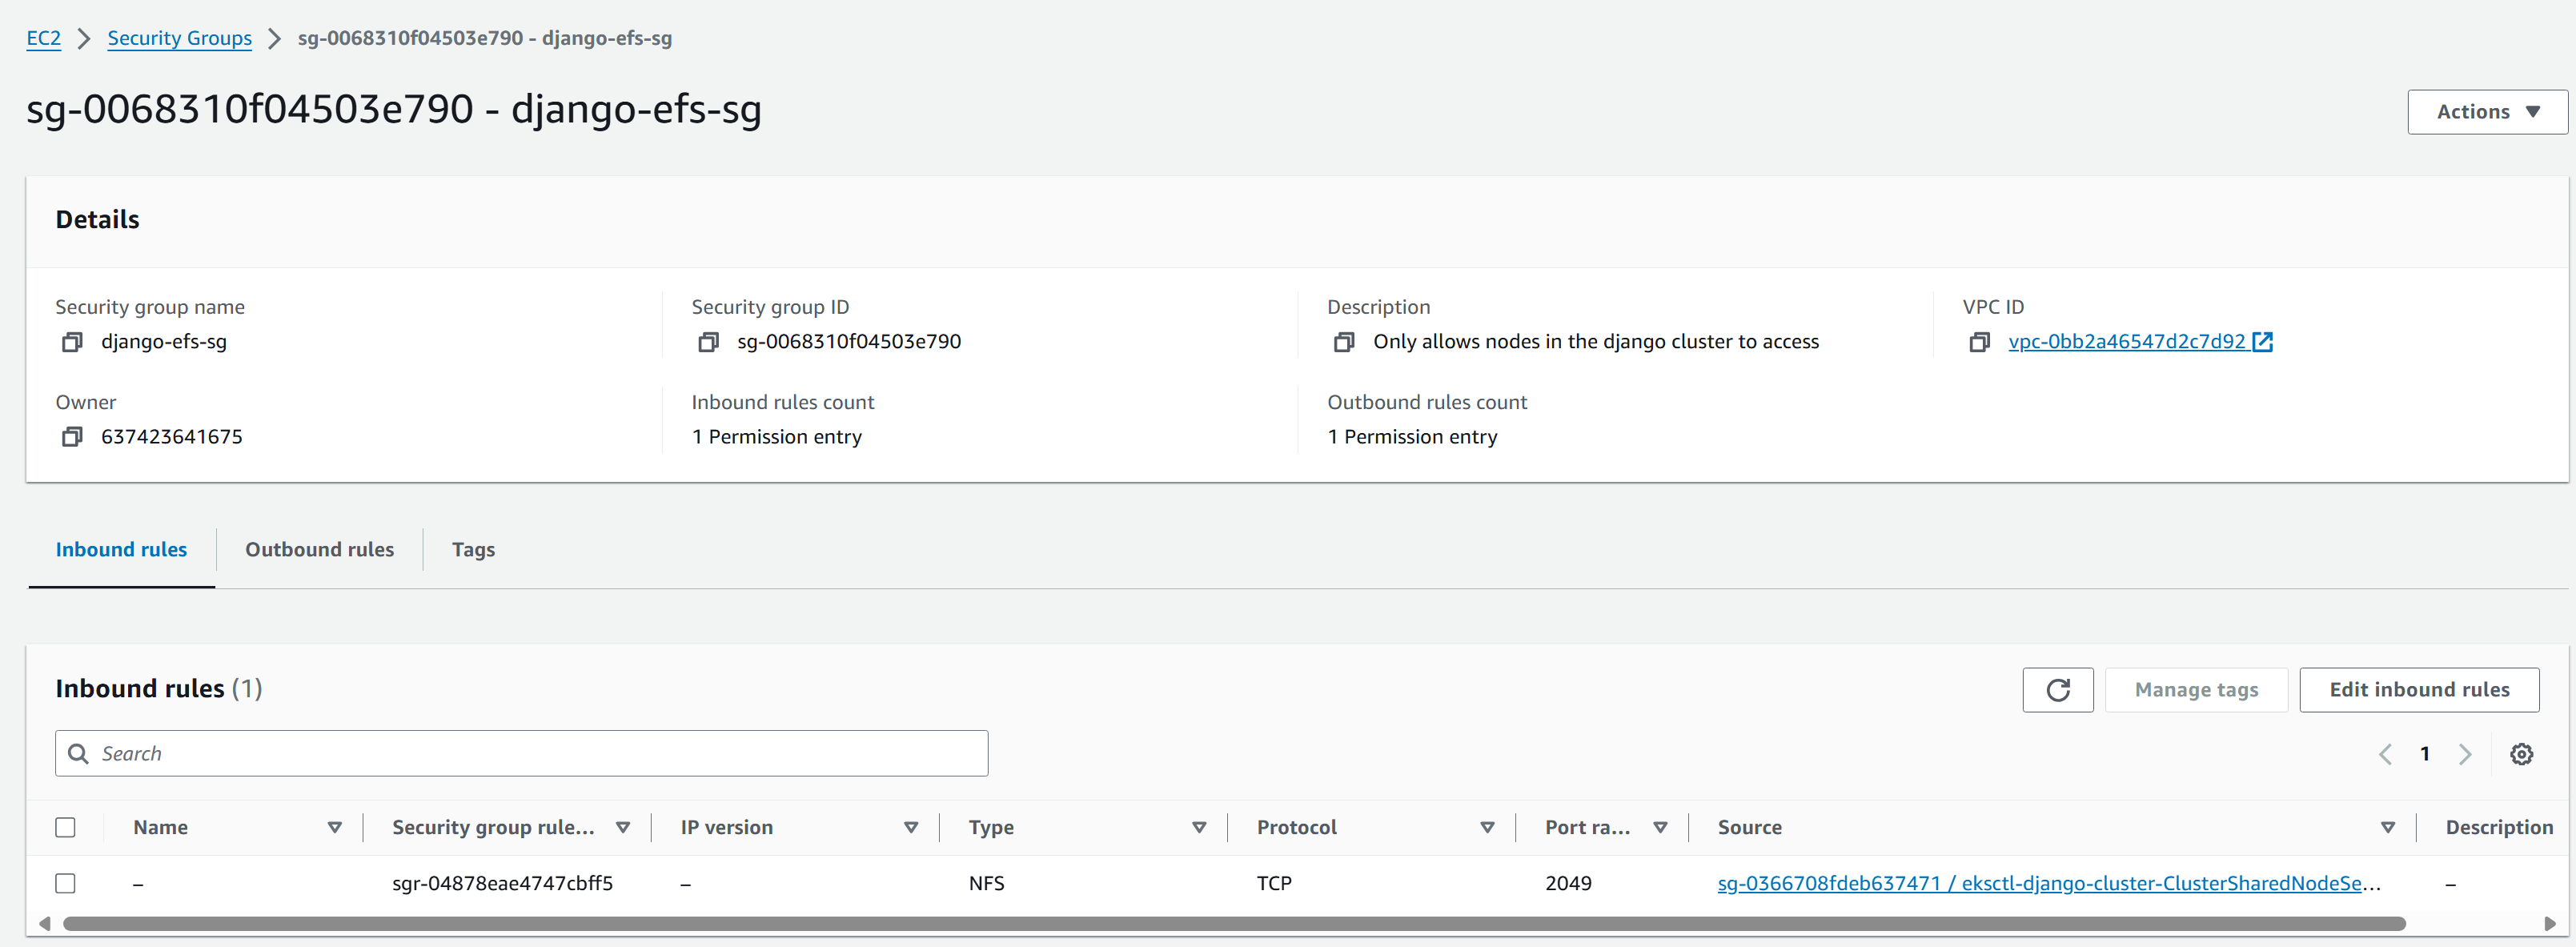
Modify the security group for EFS so that the inbound rule allows EKS managed nodes access:
Create a role for EFS CSI:
1
2
3
4
5
6
7
8
9
10
11
12
13
14eksctl create iamserviceaccount `
--name efs-csi-controller-sa `
--namespace kube-system `
--cluster django `
--role-name AmazonEKS_EFS_CSI_DriverRole `
--role-only `
--attach-policy-arn arn:aws:iam::aws:policy/service-role/AmazonEFSCSIDriverPolicy `
--approve
$TRUST_POLICY = (aws iam get-role --role-name AmazonEKS_EFS_CSI_DriverRole --query 'Role.AssumeRolePolicyDocument' | `
%{$_ -replace 'efs-csi-controller-sa', 'efs-csi-*'} | `
%{$_ -replace 'StringEquals', 'StringLike'})
aws iam update-assume-role-policy --role-name AmazonEKS_EFS_CSI_DriverRole --policy-document $TRUST_POLICYEnable EFS CSI Driver addon with the IAM role just created.

6. RDS MySQL Instance Creation and AWS Secret Access Setup
- In RDS, create a subnet group in the EKS VPC. If RDS requires public access, only add public subnets to the subnet group.
- Set up the MySQL RDS with multi-AZ (one primary, one read replica) and use the subnet group just created. Manage the credentials with AWS Secret Manager.
- Modify the RDS security group to allow EKS managed nodes access to port 3306.
- Configure pod access to AWS Secret Manager:
Install secret manager driver in the cluster:
1
2
3helm repo add secrets-store-csi-driver https://kubernetes-sigs.github.io/secrets-store-csi-driver/charts
helm install csi-secrets-store secrets-store-csi-driver/secrets-store-csi-driver --namespace kube-system --set syncSecret.enabled=true
kubectl apply -f https://raw.githubusercontent.com/aws/secrets-store-csi-driver-provider-aws/main/deployment/aws-provider-installer.yamlCreate IRSA:
- Create a policy file
secret-access.json:
1
2
3
4
5
6
7
8
9
10
11
12
13{
"Version": "2012-10-17",
"Statement": [
{
"Effect": "Allow",
"Action": [
"secretsmanager:GetSecretValue",
"secretsmanager:DescribeSecret"
],
"Resource": "arn:aws:secretsmanager:us-east-1:637423641675:secret:rds!db-1938cdfd-f861-47b0-95e0-0af179f05d84-Phb9U2"
}
]
}- Create the policy and service account:
1
2
3
4
5
6
7
8
9
10aws iam create-policy --policy-name django-eks-secret-access --policy-document file://"secret-access.json"
eksctl create iamserviceaccount `
--cluster=django `
--name=db-secret-access `
--namespace=django-app `
--role-name Django-eks-secret-Role `
--region us-east-1 `
--attach-policy-arn=arn:aws:iam::637423641675:policy/django-eks-secret-access `
--approve- Create a policy file
Create a SecretProviderClass which provides credentials to the database:
1
2
3
4
5
6
7
8
9
10
11
12
13
14
15
16
17
18
19
20
21
22
23
24
25apiVersion: secrets-store.csi.x-k8s.io/v1
kind: SecretProviderClass
metadata:
name: aws-secret
spec:
provider: aws
parameters:
region: <aws-region>
objects: |
- objectName: "rds!db-1938cdfd-f861-47b0-95e0-0af179f05d84"
objectType: "secretsmanager"
jmesPath:
- path: username
objectAlias: USERNAME
- path: password
objectAlias: PASSWORD
secretObjects:
- secretName: mysql-secret
type: Opaque
data:
- objectName: USERNAME
key: MYSQL_USER
- objectName: PASSWORD
key: MYSQL_PASSWORD
Attach secret to Django deployment:
1
2
3
4
5
6
7
8
9
10
11
12
13
14
15
16
17
18
19
20
21
22
23
24
25
26
27
28
29
30
31
32
33
34apiVersion: apps/v1
kind: Deployment
metadata:
name: django-deploy
namespace: django-app
spec:
...
envFrom:
- configMapRef:
name: app-cm
env:
- name: MYSQL_USER
valueFrom:
secretKeyRef:
name: mysql-secret
key: MYSQL_USER
- name: DB_PASSWORD
valueFrom:
secretKeyRef:
name: mysql-secret
key: MYSQL_PASSWORD
volumeMounts:
- name: secrets-store-inline
mountPath: "/mnt/secrets-store"
readOnly: true
volumes:
- name: secrets-store-inline
csi:
driver: secrets-store.csi.k8s.io
readOnly: true
volumeAttributes:
secretProviderClass: "aws-secret"
...Create ExternalName Service for RDS in EKS cluster:
1
2
3
4
5
6
7
8apiVersion: v1
kind: Service
metadata:
name: mysql
namespace: django-app
spec:
type: ExternalName
externalName: django-db.cbmkq6qqgxni.us-east-1.rds.amazonaws.com
7. ALB Ingress Controller and SSL Certificate Setup
Set up an SSL certificate in the AWS certificate manager for domain
app2.maxinehe.top.- Open the AWS Certificate Manager console.
- Click “Request a certificate”.
- Choose “Request a public certificate” and click “Next”.
- Enter domain name, in my case
app2.maxinehe.top. - Select “DNS validation” or “Email validation” (DNS is recommended for automation).
- Click “Request”.
- If DNS validation is chosen, create the required CNAME records in your DNS configuration (e.g., in Cloudflare as you mentioned).
- Wait for the certificate to be issued. This may take a few minutes to a few hours.
Download IAM Policy and create Policy ARN:
1
2
3curl -o alb_iam_policy.json https://raw.githubusercontent.com/kubernetes-sigs/aws-load-balancer-controller/main/docs/install/iam_policy.json
aws iam create-policy --policy-name AWSLoadBalancerControllerIAMPolicy --policy-document file://"alb_iam_policy.json"Create IAM Role and k8s Service Account and bind them together:
1
2
3
4
5
6
7eksctl create iamserviceaccount `
--cluster=django `
--namespace=kube-system `
--name=alb-access `
--attach-policy-arn=arn:aws:iam::637423641675:policy/AWSLoadBalancerControllerIAMPolicy `
--override-existing-serviceaccounts `
--approveInstall AWS Load Balancer Controller using HELM3 CLI:
1
2
3
4
5
6
7
8
9
10
11
12
13
14# Add the eks-charts repository.
helm repo add eks https://aws.github.io/eks-charts
# Update your local repo to make sure that you have the most recent charts.
helm repo update
# Install the AWS Load Balancer Controller.
## Template
helm install aws-load-balancer-controller eks/aws-load-balancer-controller -n kube-system `
--set clusterName=django `
--set serviceAccount.create=false `
--set serviceAccount.name=alb-access `
--set region=us-east-1 `
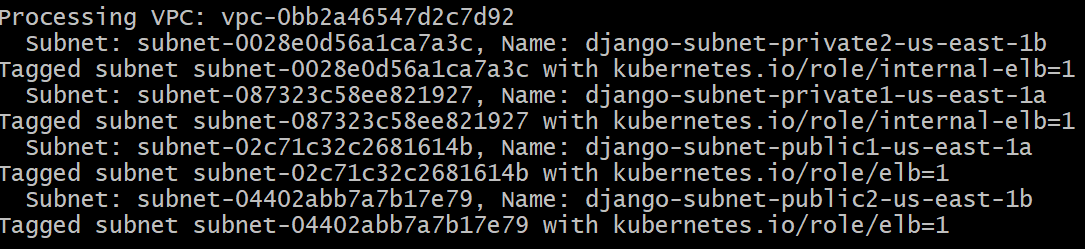
--set vpcId=vpc-0bb2a46547d2c7d92Add tags to the subnets for the EKS cluster, so that the Ingress can do auto-discovery on subnets. This step is not needed if VPC is created and managed by eksctl. Otherwise, we have to add tags to the subnets or add subnet annotations in every Ingress we create. I chose to add tags to the subnets. We run the following commands in a bashshell to tag our subnets:
1
2
3
4
5
6
7
8
9
10
11
12
13
14
15
16
17
18
19
20
21
22
23
24
25
26
27
28
29tag_subnet() {
local subnet_id=$1
local tag_key=$2
local tag_value=$3
aws ec2 create-tags --resources $subnet_id --tags Key=$tag_key,Value=$tag_value
echo "Tagged subnet $subnet_id with $tag_key=$tag_value"
}
vpc=vpc-0bb2a46547d2c7d92
echo "Processing VPC: $vpc"
# List subnets for the current VPC
subnets=$(aws ec2 describe-subnets --filters "Name=vpc-id,Values=$vpc" --query 'Subnets[*].[SubnetId,Tags[?Key==`Name`].Value|[0]]' --output text)
# Process each subnet
echo "$subnets" | while read subnet_id subnet_name; do
echo " Subnet: $subnet_id, Name: $subnet_name"
# Check for keywords and tag accordingly
if [[ $subnet_name == *"public"* ]]; then
tag_subnet $subnet_id "kubernetes.io/role/elb" "1"
elif [[ $subnet_name == *"private"* ]]; then
tag_subnet $subnet_id "kubernetes.io/role/internal-elb" "1"
else
echo "No matching keyword found for tagging"
fi
doneresult:
Create IngressClass:
1
2
3
4
5
6
7
8apiVersion: networking.k8s.io/v1
kind: IngressClass
metadata:
name: aws-ingress-class
annotations:
ingressclass.kubernetes.io/is-default-class: "true"
spec:
controller: ingress.k8s.aws/albCreate Ingress:
1
2
3
4
5
6
7
8
9
10
11
12
13
14
15
16
17
18
19
20
21
22
23
24
25
26
27
28
29
30
31
32
33
34
35
36
37
38
39# Annotations Reference: https://kubernetes-sigs.github.io/aws-load-balancer-controller/latest/guide/ingress/annotations/
apiVersion: networking.k8s.io/v1
kind: Ingress
metadata:
name: ingress-django
annotations:
# Load Balancer Name
alb.ingress.kubernetes.io/load-balancer-name: ssl-ingress
# Ingress Core Settings
alb.ingress.kubernetes.io/scheme: internet-facing
# Health Check Settings
alb.ingress.kubernetes.io/healthcheck-protocol: HTTP
alb.ingress.kubernetes.io/healthcheck-port: traffic-port
#Important Note: Need to add health check path annotations in service level if we are planning to use multiple targets in a load balancer
alb.ingress.kubernetes.io/healthcheck-interval-seconds: '15'
alb.ingress.kubernetes.io/healthcheck-timeout-seconds: '5'
alb.ingress.kubernetes.io/success-codes: '200'
alb.ingress.kubernetes.io/healthy-threshold-count: '2'
alb.ingress.kubernetes.io/unhealthy-threshold-count: '2'
## SSL Settings
alb.ingress.kubernetes.io/listen-ports: '[{"HTTPS":443}, {"HTTP":80}]'
# SSL Redirect Setting
alb.ingress.kubernetes.io/ssl-redirect: '443'
spec:
ingressClassName: aws-ingress-class # Ingress Class
tls:
- hosts:
- "app2.maxinehe.top"
rules:
- http:
paths:
- path: /
pathType: Prefix
backend:
service:
name: nginx-svc
port:
number: 80
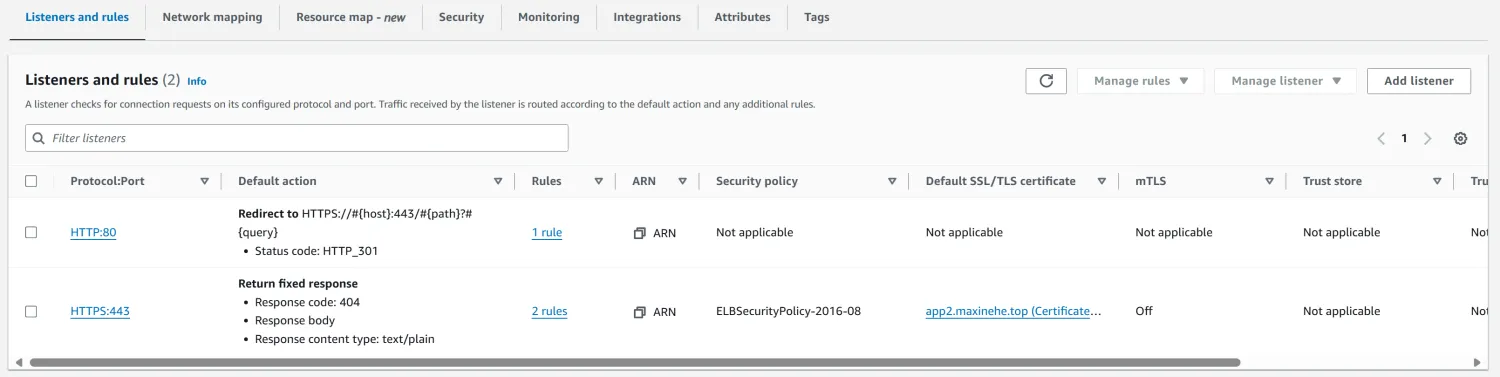
We should see a load balancer created successfully:
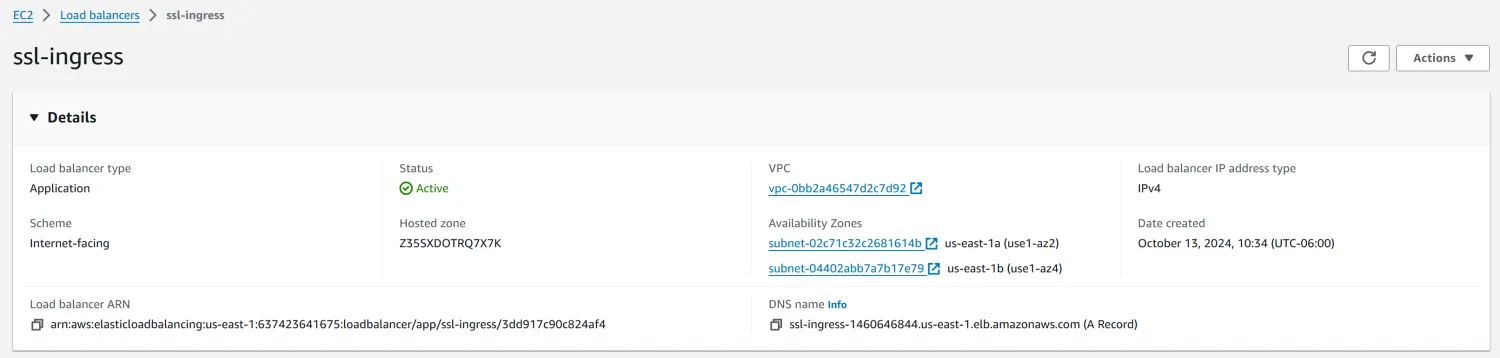
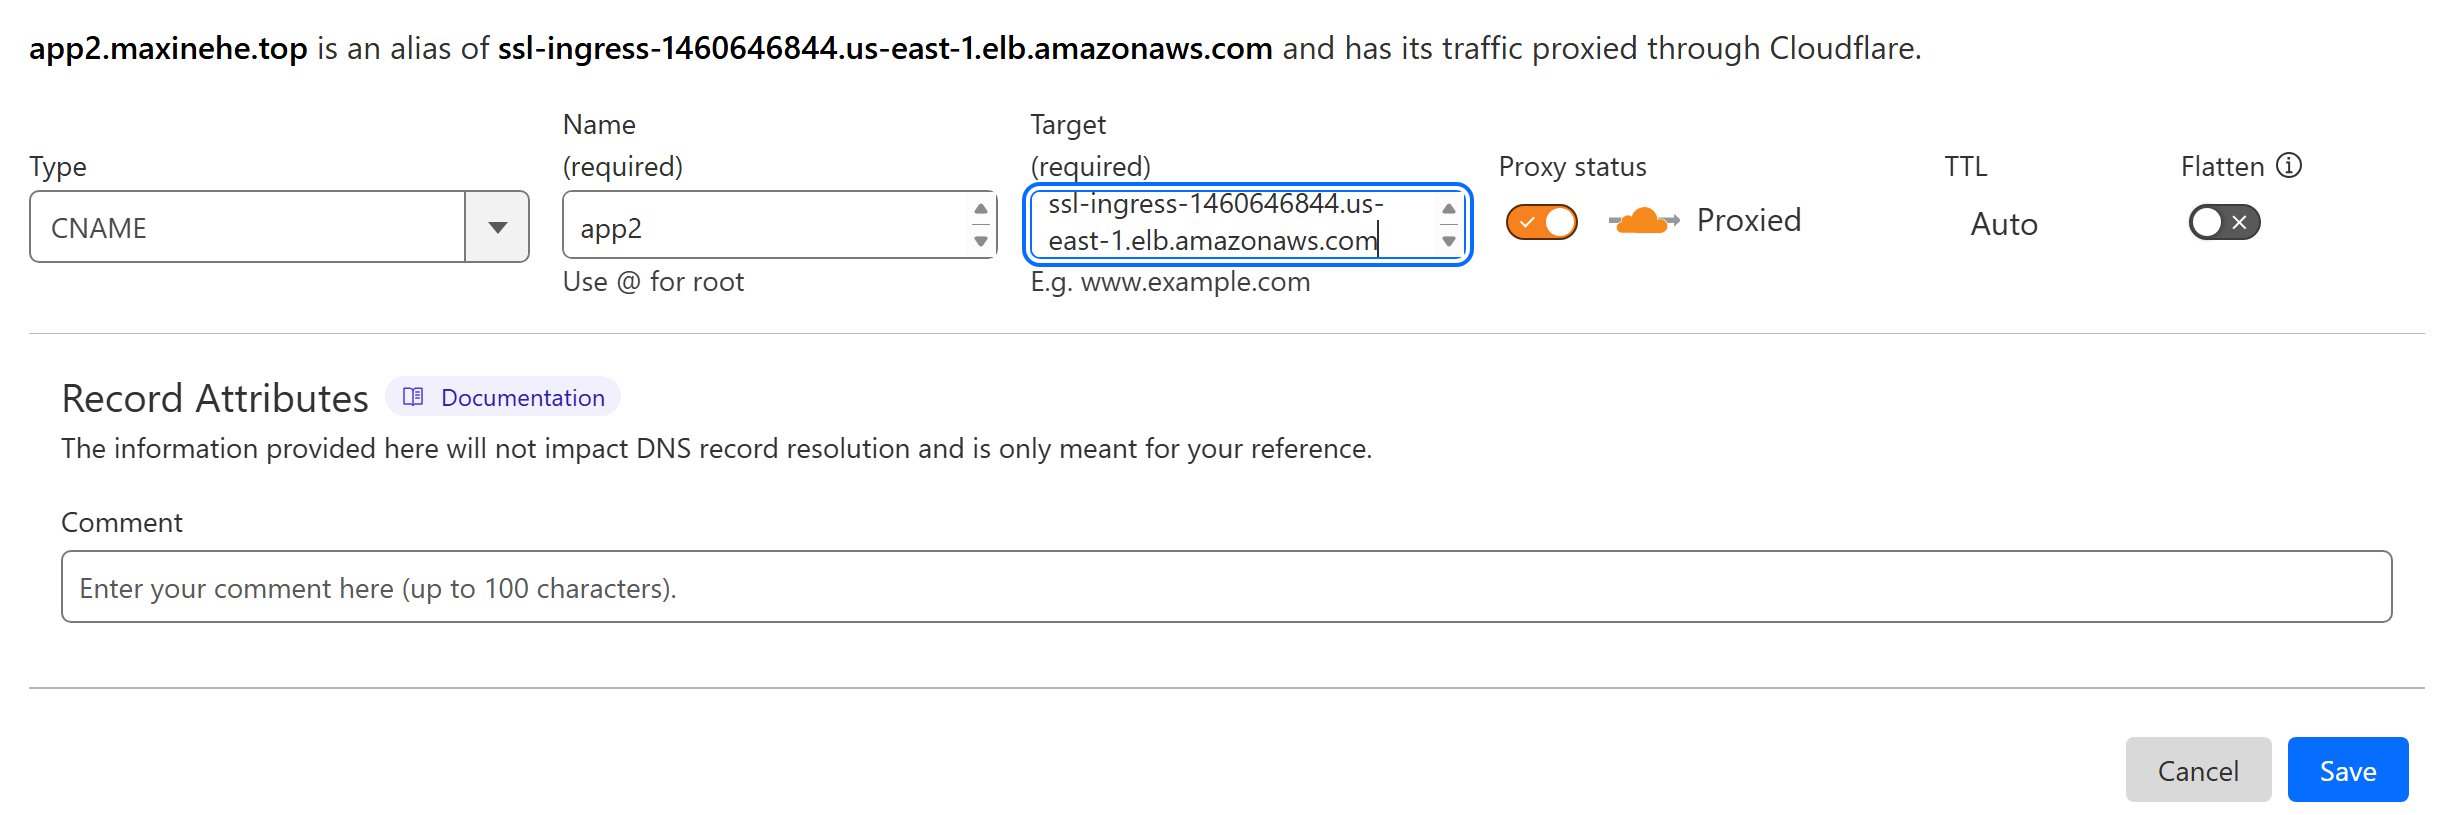
Finally, add the CNAME rule in the DNS server. Here I use Cloudflare:
Since our goal is to migrate the application to EKS, we need to migrate our local data to the RDS as well.
8. Database Migration
Go back to my local Kubernetes cluster by switching cluster context.
Create a database dump:
1
kubectl exec -it mysql-56c5c8d58c-t2ch5 -- mysqldump --no-tablespaces -u admin -pemployee@123 littlelemon > dump.sql
Copy the dump file from the pod to my local machine:
1
kubectl cp mysql-56c5c8d58c-t2ch5:dump.sql dump.sql
Get the database credentials and import the dump to RDS:
1
2
3aws secretsmanager get-secret-value --secret-id rds!db-1938cdfd-f861-47b0-95e0-0af179f05d84
mysql -h django-db.cbmkq6qqgxni.us-east-1.rds.amazonaws.com -u admin -p{pw} littlelemon < dump.sql
YAML Deployment and Functionality Testing
All the modified YAML files are available here.
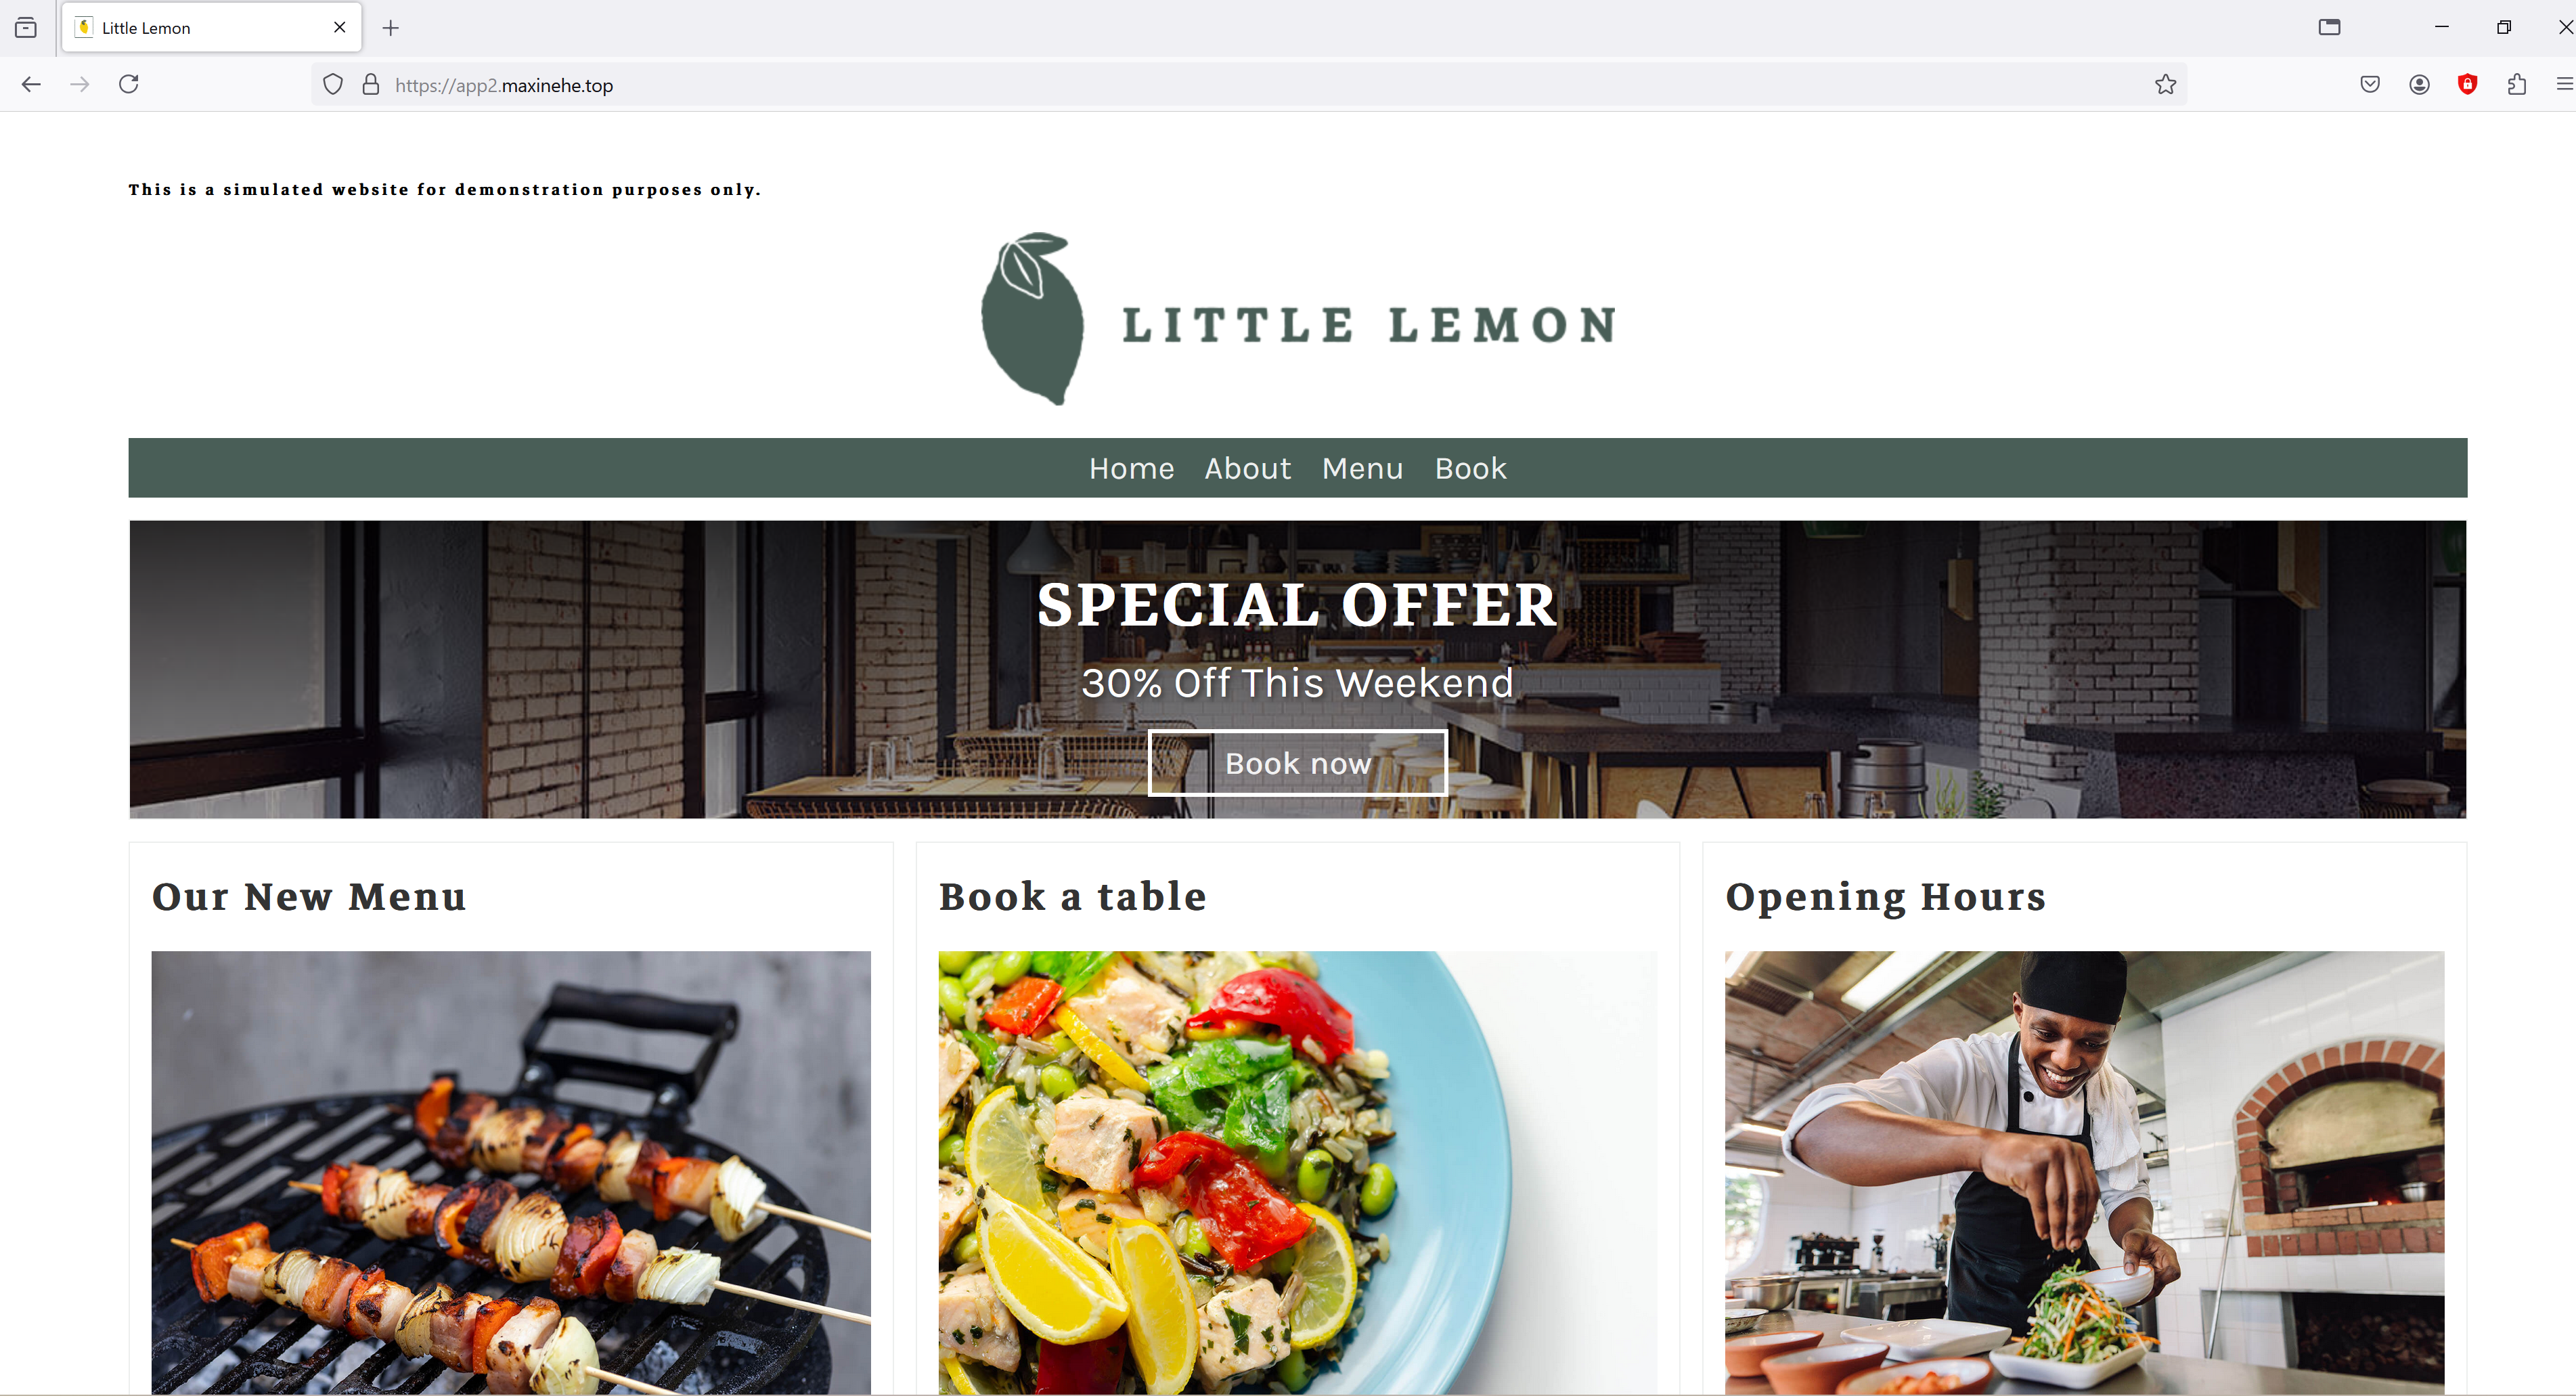
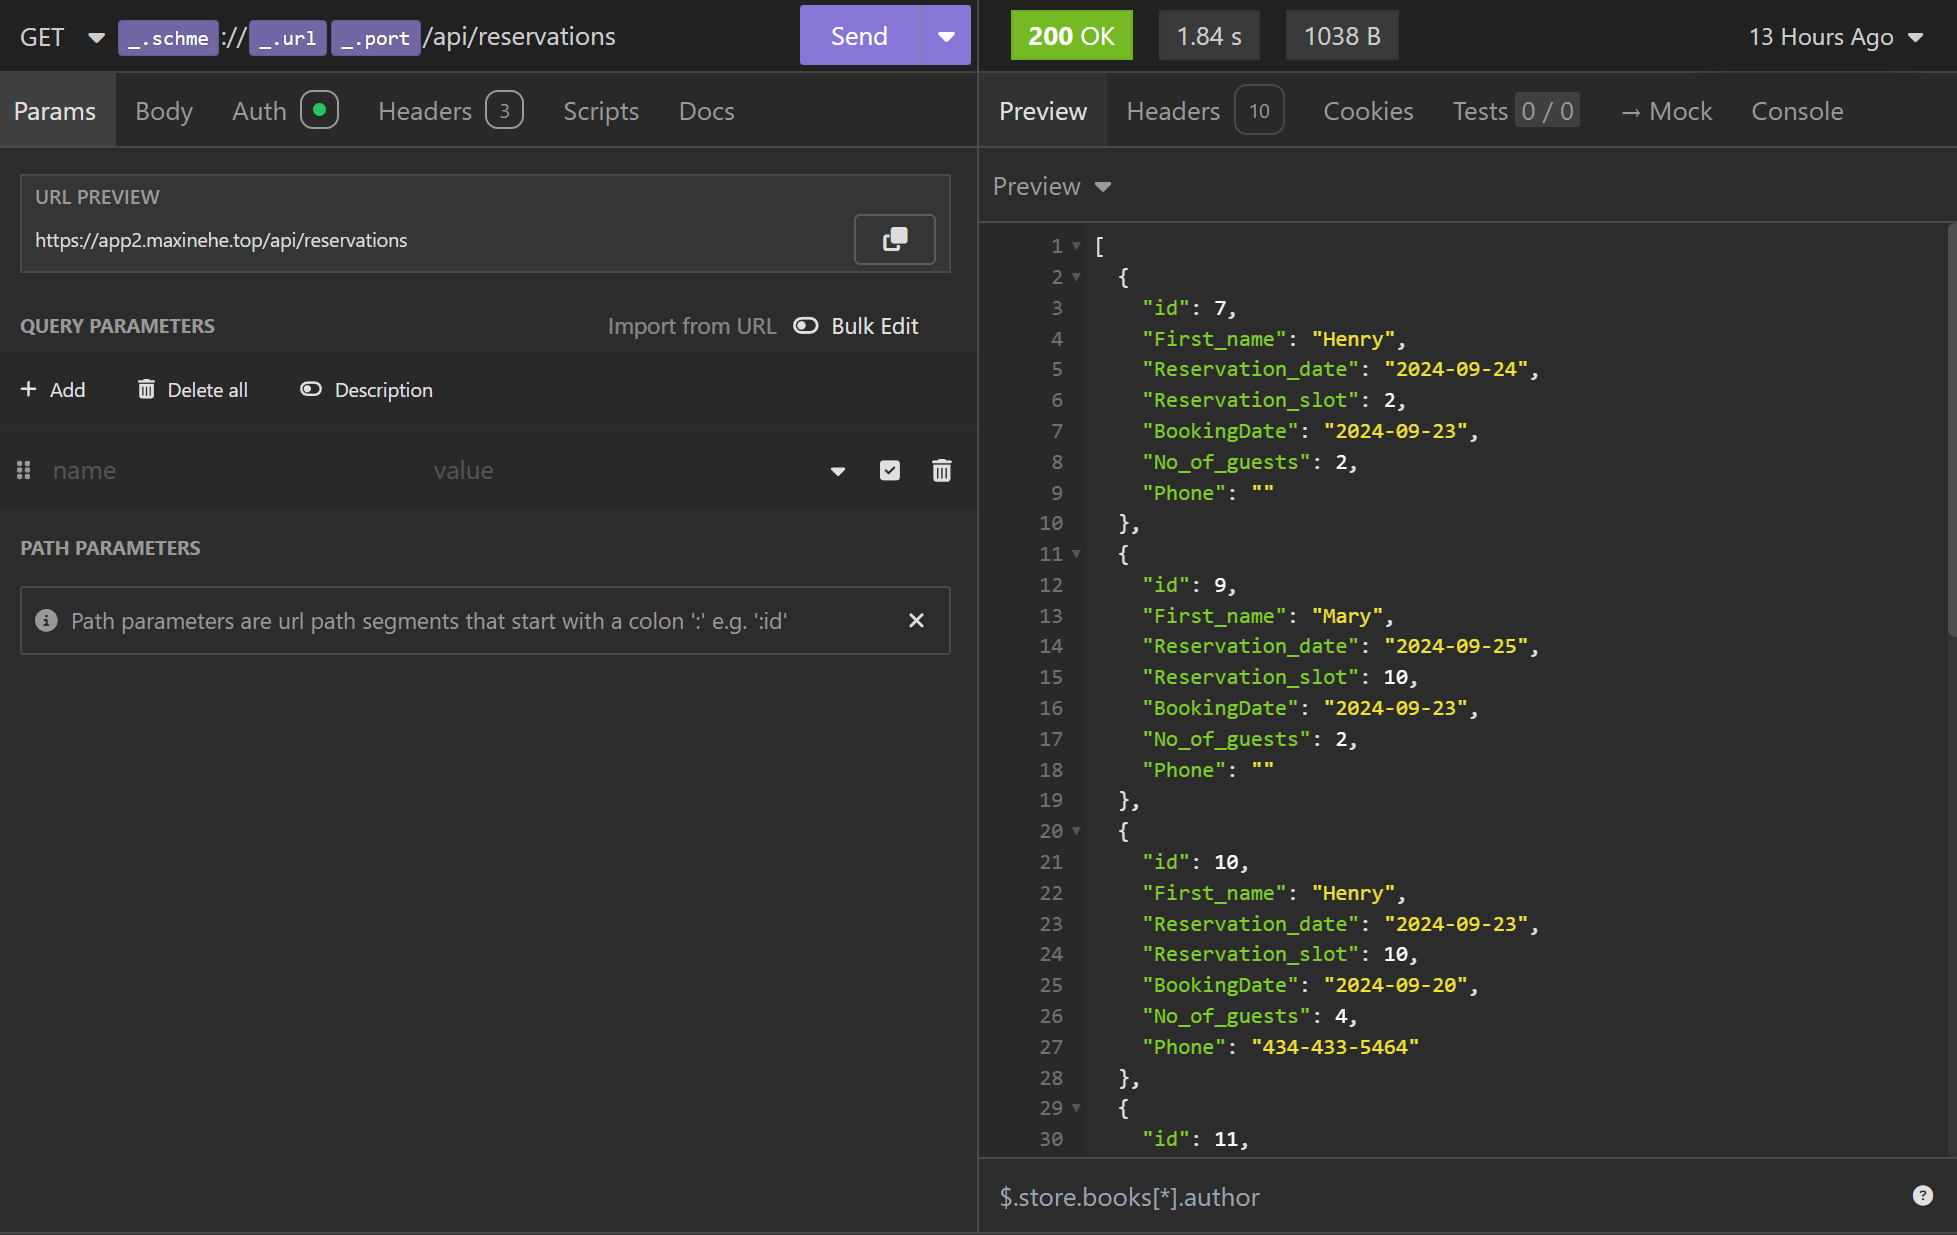
After deploying all YAML files, our website for LittleLemon restaurant is available at https://app2.maxinehe.top/. As a test, all functions work as expected. The Menu items stored in the database have also been recovered. API functions are working as expected. Cheers!

Conclusion
The journey of migrating the Little Lemon restaurant website to AWS EKS has been both challenging and rewarding. This project has provided invaluable insights into cloud-native application deployment and management, pushing me to explore various aspects of Kubernetes and AWS services.
One of the most significant challenges I encountered was configuring storage. Initially, I considered using S3 as the backend for PersistentVolume, attracted by its high availability and cost-effectiveness. However, I discovered that S3-CSI lacks full POSIX filesystem support, which is crucial for certain operations like collecting Django static files. This led me to opt for EFS, which, while different from my initial plan, proved to be a robust solution for persistent storage.
Working with EKS has been enlightening. While powerful, the service is evolving, with varying levels of integration for different add-ons. Some, like the EFS-CSI driver, are easily managed through the console or eksctl, while others, such as the Secrets Store CSI, require alternative deployment methods. This diversity in management approaches highlights both the flexibility and complexity of orchestrating a comprehensive Kubernetes environment. Despite these challenges, AWS has impressively streamlined many aspects of Kubernetes management, though there’s still room for improvement in unifying management across all add-ons and services.
A standout feature of this project was the implementation of CodePipeline. This tool significantly enhanced the development process by automating image builds, making the iterative development and deployment cycles much more efficient.
In reflection, this project has not only achieved its goal of hosting our application on EKS but has also broadened my understanding of cloud infrastructure and Kubernetes ecosystems. It’s clear that while cloud services like EKS offer powerful capabilities, they also require careful consideration and sometimes creative problem-solving to fully leverage their potential.
While the entire process has been incredibly informative, I must admit that it was also quite tedious at times. The numerous manual steps involved in setting up and configuring various components highlighted the need for a more streamlined approach. This experience has sparked my interest in exploring ways to automate the deployment process. I believe that implementing Infrastructure as Code (IaC) tools like Terraform or AWS CloudFormation, combined with CI/CD pipelines, could significantly reduce the manual overhead and make the entire deployment process more efficient and reproducible.
Moving forward, I’m excited to continue exploring and optimizing our cloud infrastructure, always keeping an eye on emerging best practices and new features that could further enhance our application’s performance and maintainability. A key focus will be on automating as much of the deployment process as possible, aiming to create a more efficient and error-free workflow for future projects.
References
Create an Amazon EKS cluster - Amazon EKS
Use AWS Secrets Manager secrets in Amazon Elastic Kubernetes Service - AWS Secrets Manager
Sync as Kubernetes Secret - Secrets Store CSI Driver (k8s.io)
Working with a DB instance in a VPC - Amazon Relational Database Service
Store an elastic file system with Amazon EFS - Amazon EKS
Route application and HTTP traffic with Application Load Balancers - Amazon EKS
Annotations - AWS Load Balancer Controller (kubernetes-sigs.github.io)